Meta Talismans: Difference between revisions
(Added Relic Changes Section for with the FAQ Provided for preparation of the 10th Anniversary Content Release) |
|||
| Line 91: | Line 91: | ||
===Relic Changes=== | ===Relic Changes=== | ||
Content releases coming | Content releases coming after the 10th Anniversary will be bringing along some changes on the way that some relics work. As we draw closer to the release date, more information will come on these changes and for now the community has provided the following Frequently Asked Questions to go along with the statements mentioned in the [[Discord|Discord #announcements channel]]: | ||
'''What existing relics will be impacted by this change?''' | '''What existing relics will be impacted by this change?''' | ||
Revision as of 13:59, 17 January 2023

Description
The Meta Talisman is a wearable item obtained by completing a quest line which begins at a mysterious Ancient Statue of Power near Valor Shrine. The Meta Talisman gives warrior, archer, and mage style players special abilities as their talisman levels. Each talisman has a passive property and active abilities that are obtainable through relics. The talisman levels up as you kill creatures and the abilities of your talisman become stronger.
The more recently added Shadow of the Rogue talisman does not require a user to run through the Quest Line but is instead available from the Gold Sink vendor in Britain.
With these bonuses come some limitations:
- The talisman cannot be equipped by any character with greater than 50 in any bard skills (e.g. music, provocation, peacemaking, discordance) or greater than 50 taming.
- The talisman skills and bonuses are not applicable against other players or pets.
- Talisman experience and relic ability gains are not possible in houses.
- Upon equipping a talisman there is a fifteen minute cool down before the skills or bonuses become active. To avoid this cool down, you can return to the Ancient Statue of Power and speak the words "I wish to pay tribute" which will take 10,000 gold pieces from your bank.
-

The message "You must rest before channeling talisman power again." comes when a Meta Talisman has been deactivated, either by becoming recently un-equipped or being involved in PVP. There is a 15 Minute Cooldown before this Talisman can become active again, or you can pay tribute to the Statue West of the Shrine of Valor for 10,000 gp by saying "I wish to pay tribute".
-

The message "You feel an icy chill as your talisman drains of some of its power." will appear if you or Monsters within homes are targeted.
Training Meta Talismans
The Meta Talismans grow in power as you use them, much like any skill in Ultima Online. They are level based with experience points required for each level in order to progress to the new bonuses for the new level. This experience is gained passively by having an activated talisman equipped on your Paperdoll and doing damage to valid animals or monsters. This damage is converted into experience and applied to the current level each time damage is done to the creature. Each talisman has a different bonus for each level, as well as, specific rules/restrictions on experience gain so be sure to refer to the specific talismans below!

| Level | Experience Required |
| 1 | 0 XP |
| 2 | 20,000 XP |
| 3 | 32,000 XP |
| 4 | 48,000 XP |
| 5 | 64,000 XP |
| 6 | 80,000 XP |
| 7 | 96,000 XP |
| 8 | 112,000 XP |
| 9 | 128,000 XP |
| 10 | 144,000 XP |
| Total | 724,000 XP |
Meta Talismans also have abilities that can be applied and also grow in power as you use them. Relics have levels which require experience, however the way experience is gained is by active use, and the levels and experience are separately tracked for each applied Relic. Each time the Relic "procs" or activates, the amount of experience will increase by 1, once the experience for that levels maximum has been reached the Relic will gain additional bonuses. Relics do not have standard experience requirements per level, each Relic will have a different number of times needed to activate before it will reach the next level. Currently the highest level for any Relic is 10.
Notes
- There is a maximum experience amount per creature that can be awarded to a given talisman. The bigger the creature, the greater the experience!
- There are Consumable Perks that can be used to increase experience gain while leveling.
- During Special Events where Double Experience is given, the Consumable Perks bonus is additive, which means that using Perks during these times will set your bonus to Triple Experience for the duration of the perk.
- Talisman experience and relic ability gains are not possible in houses.
- You can no longer gain XP if you have not cast a spell or melee attacked a mob within the last 3 minutes.
- Upon equipping a talisman there is a fifteen minute cool down before the skills or bonuses become active. To avoid this cool down, you can return to the Ancient Statue of Power and speak the words "I wish to pay tribute" which will take 10,000 gold pieces from your bank.
-
The message "You must rest before channeling talisman power again." comes when a Meta Talisman has been deactivated, either by becoming recently un-equipped or being involved in PVP. There is a 15 Minute Cooldown before this Talisman can become active again, or you can pay tribute to the Statue West of the Shrine of Valor for 10,000 gp by saying "I wish to pay tribute".
-
The message "You feel an icy chill as your talisman drains of some of its power." will appear if you or Monsters within homes are targeted.
Relics and Abilities
Abilities are applied to the talisman by finding relics at events, dungeon bosses, monster of the month spawns and at the Arch Demon and Lich Khan dungeon bosses. Each talisman has a maximum of four relic slots and aesthetic relic slots. The aesthetic slots are usable at any time and you get relic slots at levels: 1, 4, 7, 10.

There are currently four or five unique relics for each type of talisman which are detailed further below. Each relic has ten levels and leveling may lower the skill cooldown, raise the chance to activate, or provide other ability specific bonuses. These abilities typically have a random chance to activate on damage and a cooldown to only allow them to be activated at certain intervals.
To add a relic to your talisman, double click the relic and then select your talisman. Be sure to stand in a safe place while doing this as relics can be stolen!
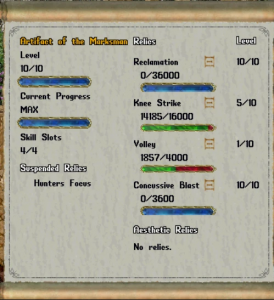
With the recent change you are now able to swap your active relics, double click your Meta Talisman and then click on the [ - ] symbol next to the relic you wish to remove from the active relic list (highlighted in yellow in screenshot). Once you have an open unused slot available you will be able to hit the [ - ] symbol next to relics in the inactive list to make it an active relic (highlighted in red in screenshot). Keep in mind if you swap frequently in a short amount of time it will put it into cooldown.

Note that you will have to be quite lucky for all your talisman's relics drop for you. You may need to frequent the Buying and Selling forums to find your relics. Keep in mind that certain relics are more popular than others and can therefore be expensive to purchase. Being part of a larger guild can also provide a useful avenue for getting relics at a reduced rate.
Relic Changes
Content releases coming after the 10th Anniversary will be bringing along some changes on the way that some relics work. As we draw closer to the release date, more information will come on these changes and for now the community has provided the following Frequently Asked Questions to go along with the statements mentioned in the Discord #announcements channel:
What existing relics will be impacted by this change?
- All talisman and pet relics which are not yet bound to a talisman or pet, excluding spider, archer, and rogue relics.
- If a relic is already added to your talisman or pet, it will not be impacted by this change.
If I have a relic already applied to my talisman or pet and this change goes into effect, what will happen to the xp and levels I’ve already earned?
- Nothing. This change only impacts the max level of relics and has no impact on the xp and levels you’ve already earned.
- For example, if you have a zerker with the tread relic at level 8, it will still be at level 8 after the change is implemented.
What about the relics I have in my house or bank that aren’t attached to a talisman or pet yet?
- Those relics will become “flawed relic fragments” once the change is implemented. At that point, when they are added to a talisman or pet, they will increase that relic’s max level by two.
- For example, imagine you have a zerker with no relics attached. Then you add a flawed tread relic fragment. Your talisman will now have the tread relic with a max level of two. Adding another flawed tread relic fragment would increase the max level of tread to four.
After the change is made, how do I get a relic to level 10?
- Once this first change is implemented, relics will come in two forms: flawed and crumbling. A flawed relic fragment will add two levels to the capacity and a crumbling relic will add one level to the capacity.
- For a relic to have a level capacity of 10, you would need to use five flawed relics of the same type or some combination of flawed and crumbling relics. For example, you could use six crumbling relics to get the max level to six, then use two flawed relics to raise it to 10.
- It is recommended that players use crumbling relic fragments to get their relic level cap to six and then switch to flawed relic fragments as crumbling relic fragments will be more easily obtainable. After level six, only flawed relic fragments can be used.
So, if I use crumbling and flawed relic fragments, my relic level will raise?
- No. Relic fragments will raise your relic max level, but they do not replace experience gains.
- For example, if you add a crumbling tread relic fragment to your talisman for the first time, your xp will show 0/250 and level 1/1. If you add another crumbling tread relic fragment, your xp will still show 0/250 and your level will now show 1/2. Adding a flawed tread relic fragment next will make your xp still show 0/250 and your level 1/4.
We use dragon and steed relics to charge spider relics and they are currently equal to using 10 power scrolls. What will the relics I have saved up in my house/bank be worth once they turn into flawed relic fragments?
- They will still be worth 10 power scrolls for the purpose of charging spider relics.
I have relics saved up that I paid a lot of gold to obtain. How will their value change after this is implemented?
- We cannot predict their economic value since it is a player-driven market. Drop rates for the various relic fragments have not been determined/announced either and that will impact economic value.
I hear that relics will be able to go as high as level 15. How do I do that?
- That is a separate change coming at an undetermined date in the future. When that happens, a third relic fragment type will be added which will be called a “flawless relic fragment”. That fragment type will increase your relic level cap by +1 and is the only relic type that can be used to increase level caps beyond 10.
- Once that change is implemented in the future, a typical progression would look like this: six crumbling relic fragments to have a level cap of six, two flawed relic fragments to increase the level cap to 10, then five flawless relic fragments to reach a final level cap of 15.
- It is important to note that crumbling relic fragments can only be used from levels 1-6, flawed relic fragments can only be used from levels 1-10 (recommended only for 7-10 due to rarity), and flawless relics can only be used from levels 11-15.
Activatable Relics
Activatable Macro Commands
While most Relics are passively used, meaning that you do not have control over when a Relic will Proc, some Relics(such as the Artifact of the Marksman Relics) are now having the ability to be manually activated with a newly added "Relic Ability Macro". Here is an overview on how to add these new macro commands to your client:
-
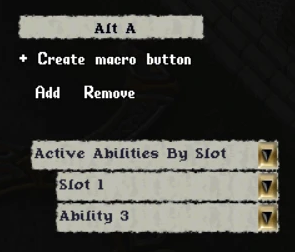
Click on options on your paper doll and click the Macros tab. Create a new macro and then set it up like this (using whatever hotkey you want)
-
Here is the Example Scenario for the following Instructions.


'Slot 1' is just the talisman itself so make sure you always choose Slot 1. The ability number depends on where the relic is in the order from top to bottom on the talisman. As you can see on mine, Concussive Blast is the fourth relic down. But, it's the third relic that has an active ability so I've chosen 'Ability 3' in the second dropdown menu above. The game doesn't count Reclamation because that has a passive ability and doesn't need to be activated to work. So because I chose 'Ability 3' for this macro, the macro is going to look for the third active relic and use that one. If my relics were in a different order, such as concussive blast, reclamation, knee strike, then volley and I want the macro to activate concussive blast, I'd choose 'Ability 1' because it is the first active relic in the list. If I wanted a macro/hotkey for volley in that scenario, I'd choose 'Ability 3'. Even though volley would be fourth down in the list, it's only the third active relic so it needs to be 'Ability 3'.
Activatable Menu Bar
There is also a Menu Bar for Activatable Relics which will fill up for you to click on when your Meta Talisman detects a Relic with an Activatable Ability. In this example you will see the Vivify Relic which is an Activatable Relic that needs to choose a valid Summoned Pet in order to be used.
-
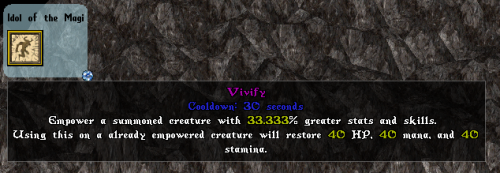
The Activatable Relic Menu showing the Activatable Relic "Vivify" which is a clickable button that will bring up a crosshair to use on a summoned pet.
-
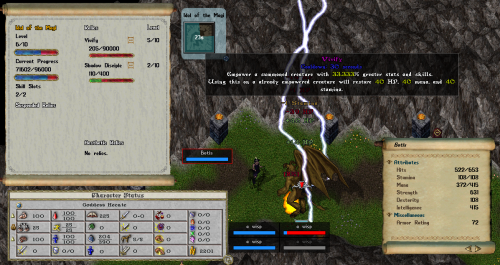
The Vivify Relic in use with the Activatable Menu.


Aesthetic Relics
As mentioned there are currently four different aesthetic relics that apply to your Meta Talismans or Meta Pets. Pets require to be either a max evolution dragon (after feeding it fruit), at least a level 6 spider, or at least a level 6 steed.
Aesthetic relic activation percentage is essentially an average of all aesthetics currently applied and online. The average percentage of having all four online is 10%. This means 10% of your kills will result in one of the four activating, they can not double activate on the same kill.
-
Ascension Relic
(click to preview) -
Bloody Explosion Relic
(click to preview) -
Chicken Dinner Relic
(click to preview) -
Combustion Relic
(click to preview)


The new Aesthetic relics are here! Below you will see how to obtain each of the four relics. Ascension is on the donation vendor Nadine. Bloody Explosion is gained as a reward from doing monster contracts for Heracles. Chicken Dinner is on the gold sink vendor Sasha. Combustion is a drop from defeating the Warden boss in Asylum.
-
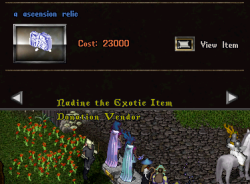
Ascension Vendor
(Donation Coins) -
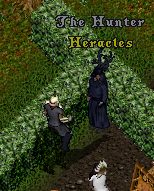
Bloody Explosion Vendor
(Contracts) -
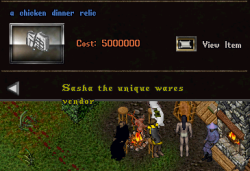
Chicken Dinner Vendor
(Gold Sink) -

Combustion Relic Boss
(Warden Boss Drop)


Quest Line
Be forewarned, the quest to obtain a Meta Talisman is not for the impatient, frugal or faint of heart! You may complete the quest multiple times on one character but you will only be able to wield one talisman at a time.
To begin the multi-part quest you must travel just west of the Valor Shrine where there is a tall statue:

1. Beginning the quest: Stepping in front of the statue and speaking out loud will offer a quest gump.
2. A dull stone: Accepting this quest will give you with a dull stone that must be empowered with Vanquishing weapons. The absorb a Vanquishing weapon into to the stone, double click it and target the weapon. The stone can only be charged with true instruments of war. Daggers, cleavers, knives and pitchforks cannot power it. After 30 Vanquishing weapons have been absorbed by the stone, you can return to the statue.
3. Evil creatures: Speaking to the statue again will empower the stone, opening the second part of the quest. You must now kill 100 "evil" creatures. These creatures must have a minimum fame level to be accepted by the stone. Creatures of this stature include Dragons, Drakes, Daemons, Ogre Lords, Lich Lords, Deep Earth Elementals, Orc Mine Overseers, Paragon Lichs etc. Note that you will have to kill these creatures by yourself. The level of "evilness" is determined by the monster's health points which must be 400 or higher. Some Deep Earth Elementals, for example, will be just below the required level of "evil" because they have less than 400 health points. Once you've killed those creatures and the stone is filled, return to the statue and speak again.
4. Daemon archlord: Now you have to visit the Daemon Archlord's lair! Also known as the Arch Demon, he is located in Wrong on level 3. In the center of the room you will find a small red statue. Double click that to collect the Arch Demon's blood. Be cautious however, if the Arch Demon is around, you will have a hard time getting to the statue! If you want to take on the boss himself, it is recommended that you familiarise yourself with his attack mechanics first.
5. Choosing your talisman: With the Arch Demon's blood in your bag, double click your stone and select the blood to purify the stone. Now you can speak once more to the statue with your purified stone and you will be able to choose one of the four talismans:
- Idol of the Magi (Mage Tali)
- Phylactery of Resilience (Defense Tali)
- Totem of the Berserker (Zerker Tali)
- Artifact of the Marksman (Archer Tali)
Idol of the Magi

The Idol of the Magi, informally known as Meta Mage, provides a spell damage bonuses and mana cost reduction for offensive spells against creatures. The ten levels of the talisman average a 20% bonus per level. The mana cost reduction is calculated by the talisman level, number of relics applied, and spirit speak.
Levelling
While levelling, your talisman experience gains are reduced if you are wearing armor. The penalty is 1.6% per AR. There is however no range penalty for Meta Mages. You can therefore stand at a safe distance while firing your lightning bolts at those big ugly creatures!
Spirit Speak
Spirit Speak reduces the cost of spells. With the talisman at level 10 with four relics applied an energy bolt will cost as little as 10 mana with 100 Spirit Speak, 14 mana with 50 Spirit Speak and 16 mana with 0 Spirit Speak.
Mana Reduction Sources
- (Spirit Speak Skill/4)% e.g.: 25% mana reduction at 100 Spirit Speak, 12.5% at 50.
- (Talisman Level)% e.g.: 1% at level 1, 10% at level 10.
- Bonus 10% reduction when four relics are enabled.
These bonuses are all additive, meaning if you have GM Spirit Speak, a level 10 Talisman, and four Relics enabled, your spell's cost will be reduced from 45% (mana costs are rounded up to the next whole number!)
It is also worth noting the Relic Transcendence reduces the base cost of spells by (relic level), which these percentage reductions then apply to.
Relics
- Dispersion
- Dispersion provides a chance for spell damage to be dispersed to nearby enemies. There is a 10% chance for an offensive spell to damage level-dependent number of creatures within a 3 tile radius. At level one, the damage can disperse onto one additional creature and the cool down is 60 seconds. At level ten, the damage can spread to up to ten additional creatures and the cool down is 45 seconds.
- Focus
- Focus provides a chance for increased spell damage. Spell damage can do (Focus Level / 20) additional damage to the target creature. For example, at level 1, this would be 0.05% (1/20) additional damage. An offensive spell that hits for 100 will therefore generate an additional 5 damage, shown as a separate damage number. In the same scenario, at level 10, focus can generate an additional 50 spell damage. The Focus relic cooldown begins with a base of 35 seconds and falls 2 seconds per relic level for a total of 15 seconds at Level 10. The chance of activation is 95% after the cooldown expires.
- Shadow Disciple
- Shadow Disciple provides a chance to return some mana and temporarily lower the resist of creatures that are casted upon. Mana recovery is calculated by: (damage * (10.0 + (Level * 2.0)) / 100.0). The resist of the target is modified by: resist * (1.0 - (((Level * 2) + 10.0) / 100.0)).
- Transcendence
- When this Relic is activated, your character will go into a trance, be covered in a blue aura, and be able to cast hostile spells(such as Lightning) in a frenzy for up to 10 seconds. This is similar to how the Quicksilver Relic works where instead of increasing the attack speed, this Relic will increase the casting speed! If you enter into PVP(Player vs Player) combat during this trance, the Relic will deactivate.
- Vivify
- This Activatable Relic is used to buff a summoned creature that you can control(such as a Daemon or Elemental but not Energy Vortexes or Bladed Spirits). The ability has a Channeling time, which means the summoned creature needs to stay within 3 tiles of the targeted location that the spell began before the Vivify buff can be applied. If the target stays within the location until the end of the animation, then the following buffs will be applied:
- Increase in Skills and Stats equal to Relic level * 6.66% .
- Armor increased by Relic Level * 4.44%.
- Duration that the summon will stay active is increased to 8 minutes.
- The chance to dispel a summoned creature will be reduced, which will be the Normal Dispel Chance / (Relic Level + 1). Higher Levels means lower chances to dispel this Vivified Target.
- Vivified Targets will be dyed a random Metallic color, unless your Meta Talisman has been dyed. Dyed Meta Talismans will apply their colors to Vivified Targets.
- If the target is already Vivified, the targets Health, Mana, and Stamina will be restored by a set amount, repeatedly for a short duration. This also applies to non-Vivified summons!
- Notes:
- The Target will receive a buff relative to the Level of the Relic, the higher the level, the better the buffs.
- Only while the Target is Vivified will Relic XP be granted after killing a sufficiently difficult monster of which there will need to be a minimum amount of 1 damage done by that summoned creature.
- Vivify XP gains will also include the damage from the Vivify Owner. As long as the Vivify Summon has dealt 1 damage to a target, the Vivify XP gained will be calculated as if all damage from the Vivify Owner is from the Vivify Summon.
- If you enter into PVP(Player vs Player) combat, the Vivify will deactivate.
Tips, Tricks and Templates
When completing the initial quest line, you may want to consider switching your character to a warrior or tank mage to complete killing the 100 evil creatures. Alternatively, make use of slayer spell books to kill the evil creatures as a pure mage but note that this can be somewhat laborious as you cannot use summons to help you.
The Meta Mage is arguably the most laborious of all the talisman. You should therefore make best use of all things that improve levelling efficiency:
- Don't wear any or very minimal armor. Leather bought from NPCs with slayer properties applied will provide the best balance for damage mitigation and experience gains.
- Level up Spirit Speak to 100 for spell cost reduction.
- Use Slayer Spell books to increase spell damage and therefore experience gains but be aware that at higher levels when you start dishing out some serious damage and killing monsters quickly, you may be better off using weaker spells or dropping the slayer spellbook to eek out the maximum possible experience per monsters. Note: Unlike normal spellbooks, crafted slayer spell can be stolen.
- Apply the Shadow Disciple relic first as it provides both increased damage and returns mana.
- Kill the biggest creatures you can find. If you are struggling, ask a friendly tamer or bard if you can follow them around and cast spells on the creatures they are killing.
Common templates are:
- Magery, Evaluating Intelligence, Healing, Anatomy, Spirit Speak, Meditation, Resisting Spells - This provides defensive wresting through Evaluating Intelligence and Anatomy, allows bandages to be used to heal and therefore save mana and Spirit Speak to conserve mana. Resisting Spells is useful to mitigate interruptions from poisons and paralyze spells.
- Magery, Evaluating Intelligence, Spirit Speak, Wrestling, Inscription, Meditation, Resisting Spells - Inscription lets you craft your own slayer spell books and number of spells that can be reflected with the Magic Reflection spell.
Phylactery of Resilience
 The Phylactery of Resilience, informally known as the Defence Talisman, offers increased protection from melee and magical damage from creatures. There are ten levels of the talisman and on average you gain 5% protection per level.
Leveling
You gain experience with this talisman by doing damage to creatures. The amount you gain is penalized by wearing too little armor. To ensure maximum experience gains, keep your armor at or above 80. The amount of experience gained is also affected by distance from the creature. The penalty is 20% for each tile beyond 1.5. Stay close, be well armored and crush those evil creatures!
Arms Lore
The wielder of an active Phylactery of Resilience, Totem of the Berserker, or Artifact of the Marksman with 100 Arms Lore and 100 Weapon Skill receives an increased Minimum Hit Chance. You will only get this increase if you are wielding a weapon relevant to your chosen Weapon Skill. For example, against a creature with 100 wrestling, a normal warrior with 100 Swordsmanship wielding a katana has a 50% chance to hit the creature. With the talisman and 100 Arms Lore, this increases to ~63%. Note, however, that this does not raise your Hit Chance by a flat amount it just raises it to ~63% if you are currently below that. If you intend to kill only lowly ogres and ettins, you can probably skip Arms Lore. If however you want to take on bigger monsters such as with 100 or greater wrestling, such as dungeon bosses, then consider fitting this into your template.
Relics
- Leech
- Leech provides the ability for the player to sap small amounts of health from nearby creature when damaged. The amount per creature is capped at the skill level and is a random value from 1 to relic level. The chance to activate and cool down are affected by gaining levels.
- Quench
- Quench provides a chance to resist fire breath. Once triggered it provides protection against fire breath for a period of time determined by the relic level. The duration lasts for (Level * 5) seconds. The cooldown decreases by 90 - (Level * 2).
- Recoil
- Recoil provides a chance for melee damage done to a player to reflect back on the attacking creature. When it activates, it returns 2x base damage to the creature. There is a 25% chance to turn an opponent's attack onto him. At Level 1 it starts with a 30 second cooldown. With each level the cooldown reduces by 1 second, resulting in a 20 second cooldown at Level 10.
- Remedy
- Remedy provides a chance to resist poison from a melee hit, such as a scorpion's sting, for a period of time determined by the relic level. There is a 25% chance to become immune to poison for (Level * 4) seconds. The cooldown decreases by 90 - (Level * 3).
- Shield Bash
- Shield Bash does a mighty stunning bash to your enemy. Factoring in your skill in parry and your relic level at level 10 it provides a 3x modifier in damage based of your weapon. Including the damage it also stuns your target for 5 seconds. The cooldown decreases by 30 - (Level * 1).
Tips, Tricks and Templates
The defence talisman is the most casual to level, sitting comfortably between the fast, furious zerker and the laborious, cautious meta mage. While you may need to pay slightly less attention to your health bar than the other talismans, you can't completely disengage. Keep the following things in mind:
- Keep your armor at or above 80 at all times. Regularly check armor damage as you will be taking some big blows from the level of creature you will be fighting. A character with blacksmith will come in handy for repairs or you will need to stock up on repair deeds.
- Strongly consider including Parrying in your template to protect your armor and provide extra damage mitigation. This is particularly useful at lower levels.
- Consider using a Swamp Dragon for even more damage mitigation.
- If you can afford it, consider adding some slayer properties to your armor.
- Quench and Remedy are best applied early on as they provide excellent protection and can take quite some time to level up.
A classic template is:
- Weapon Skill, Parrying, Healing, Anatomy, Resisting Spells, Tactics and either:
- Magery for overall utility. The ability to use Reactive Armor, Recall, Cure, Reflect, and Teleport are all very useful.
- Arms Lore to increase your hit chance (Using runebooks loaded with recalls to travel around).
Totem of the Berserker
 The Totem of the Berserker, informally known as the Berserker or Zerk Talisman, provides offensive damage bonuses for melee skills. There are ten levels of the talisman and on average you gain 5% damage per level. This Damage Bonus can be applied to Archery, however only up to 2 tiles away, it is recommended to use Artifact of the Marksman to get the most out of ranged combat!
Levelling
The more armor you wear, the less experience you gain for damaging creatures at a rate of 1% per AR. As with the Defence Talisman, there is a distance penalty on experience gained of 20% per tile beyond 1.5 tiles.
Arms Lore
Arms Lore has the same effect Minimum Hit Chance increase for the Totem of the Berserker as it does for a Phylactery of Resilience Talisman. Further details are provided in the Phylactery of Resilience section.
Relics
- Double Strike
- On a successful swing this relic may activate which the berserker will double swing on the creature. It does an instant swing following a normal swing provided you are within 5 tiles and starts with a 25% chance to activate with a 30 second cooldown. The damage is recalculated for the second strike so the damage number will almost certainly differ. Leveling this ability lowers the cooldown and increases the chance of activation.
- Infected Wounds
- When this relic activates on a hit, the target becomes infected with a special debuff that increases the damage that the target takes from this Relic. When a target has the Infected Wounds debuff active, it will begin to take damage every 0.5 seconds for 3 seconds which the damage will increase as the target loses hit points. The damage calculation per 0.5 seconds is based on Relic Level and the current Missing Hit Points, which is the Highest of the Lowest value of either 10% of the targets Missing Health or the Infected Wounds Relic Level * 4 in damage. AKA Damage Calculation = Larger of (Smaller of ( 10% of missing health, or Level * 4 dmg), Level)
- Phase Shift
- Upon attacking a creature at range the berserker teleport attacks to the targeted creature. The cooldown starts at 60 seconds but has a guaranteed activation on attack. The target must reside on a tile that can be walked on and more than 7 tiles away. Originally, the ability received an additional phase jump for every other level gained for a maximum of 3 and each shift consumes 10 stamina but this was modified as it was teleporting players into some dangerous situations! Phase Shift now teleports to a single target. Each level lowers the cooldown. 100 Hiding and Stealth will provide 50% bonus damage when phase shifting while hidden.
- Tread
- The berserker can trample an enemy either on foot or while mounted. Full stamina is required and the weight of the character is taken into account. Carrying 314 stone is considered full weight and will provide maximum damage for your level. At level 10 the ability can provide up to a maximum of 300 damage. It has 100% chance to activate if the ability is available and the bersker's stamina is full.
- Primal Scream
- You can Activate a scream every 30 seconds that will provide yourself with a buff to both your Dexterity and Stamina of the Primal Scream Relic Level times 40 for a total of 5 seconds. This will by default increase your swing speed as Dexterity and Current Stamina are a factor in determining how fast a weapon swings in your hands!
Tips, Tricks and Templates
Buy refresh potions, lots and lots of refresh potions.
The Zerker talisman is fun and engaging to level. As long as you follow these basic rules, you should be able to quickly progress through the levels:
- Like the Meta Mage and in keeping with your title, a berserker should wear little or no armor for maximum gains. Leather bought from NPCs with slayer properties applied will provide the best balance for damage mitigation and experience gains.
- Unlike the Meta Mage, you do not have the luxury of standing at range and if you cannot afford a full set of slayer armor, you may need to resort to jousting.
- As you may need to joust, Arms Lore is very useful for efficient levelling to provide a greater chance for a successful hit.
- Definitely do not use a shield or parrying, your armor will be too high reducing your experience gains.
- Use slayer weapons to ensure you get maximum damage.
- Primal Scream is a good choice for a first relic to start out with, it gives a great damage boost which levels the talisman faster and is an Activatable Relic so there are no wasted procs, plus it's fun!
- Use a Swamp Dragon to reduce damage taken.
There are many different ways to play a Zerker but here are a few suggestions to get you started:
- Weapon Skill, Tactics, Anatomy, Healing, Resist, Arms Lore and either:
- Magery for overall utility. The ability to use Reactive Armor, Recall, Cure, Reflect, and Teleport are all very useful
- Lumberjacking for even more damage if you opt for Swordsmanship.
- Hiding for a quick escape to avoid really nasty creatures (and players).
Shadow of the Rogue
The Shadow Of The Rogue talisman is a take on the classic RPG rogue class. It includes four new relics and an entirely new relic leveling concept. The talisman itself levels in the same manner of the existing talismans. This talisman and relics are available on the gold sink vendor. The talisman itself for 1m gold and each relic for 4m. You do not need to complete the talisman quest to obtain this talisman. The built in bonuses are:
- Knives get a Level * 20% bonus to knife weapons (i.e. 200% at Level 10)
- Crossbows get a Level * 13% (i.e. 130% bonus at Level 10)
- The wearer gains the ability to run while stealth to a distance of 5 * Level tiles (i.e. 50 tiles at Level 10)
The relic leveling mechanic is designed to make the leveling process much less cumbersome and yet reward those that dedicate themselves to using this talisman.
The talisman relics track kills of all creatures that have over 100 max hit points. The relic levels of the talisman are based on the number of kills recorded. 20 kills for level 2 relics, 50 kills for level 3 relics, 90 kills for level 4 relics, 150 for 5, 300 for 6, etc. You will have level 10 relics with 700 stored kills. Every 24 hours 25 kills will decay from the total kill count. You can build up to 800 kills, but the total will be capped at that number. This will allow you talisman 4 days of not being used before it reverts down to level 9 relics on 5th day.
Levelling
The more armor you wear, the less experience you gain for damaging creatures at a rate of 1% per AR. As with the Defence Talisman, there is a distance penalty on experience gained of 20% per tile beyond 1.5 tiles.
Arms Lore
Arms Lore has the same effect Minimum Hit Chance increase for the Shadow of the Rogue as it does for a Phylactery of Resilience and Berserker Talisman. Further details are provided in the Phylactery of Resilience section.
Relics
- Disembowel
- Bleed attack that does 10 ticks of relic level damage every 30 seconds
- Elude
- Damage absorption of relic level * 2% every 30 seconds that lasts up to 20 seconds per activation
- Ruthless
- This is a passive relic that gives relic level * 2% bonus damage to poisoned targets. This is always on and does not give trigger notifications.
- Shadow Dance
- Area effect attack that hits up to 4 nearby creatures with bonus damage based on relic level
Tips, Tricks and Templates
The Rogue talisman is fun and engaging to level. As long as you follow these basic rules, you should be able to progress through the levels:
- Like the Meta Mage and Berserker, wear little or no armor for maximum gains. Leather bought from NPCs with slayer properties applied will provide the best balance for damage mitigation and experience gains.
- Unlike the Meta Mage, you do not have the luxury of standing at range and if you cannot afford a full set of slayer armor, you may need to resort to jousting.
- As you may need to joust, Arms Lore is very useful for efficient leveling to provide a greater chance for a successful hit.
- Definitely do not use a shield or parrying, your armor will be too high reducing your experience gains.
- Use slayer weapons to ensure you get maximum damage.
- Use a Swamp Dragon to reduce damage taken.
There are many different ways to play a Rogue but here are a few suggestions to get you started:
- Weapon Skill, Tactics, Anatomy, Healing, Resist, Arms Lore and either:
- Magery for overall utility. The ability to use Reactive Armor, Recall, Cure, Reflect, and Teleport are all very useful
- Hiding for a quick escape to avoid really nasty creatures (and players).
- The Weapon Skill should ideally by Fencing (with Daggers), Swords (with Knives) or Archery (with regular crossbows) to benefit from the increased damage.
Artifact of the Marksman
![]() Artifact of the Marksman is an Archery focused talisman. It provides multiple options to suit your playstyle by providing Area of Effect (AOE) and Crowd Control (CC) options. It also increases single target damage by amplifying damage output and attack speed.
Artifact of the Marksman is an Archery focused talisman. It provides multiple options to suit your playstyle by providing Area of Effect (AOE) and Crowd Control (CC) options. It also increases single target damage by amplifying damage output and attack speed.
Levelling
While levelling, you have no penalty for having any amount of AR unlike other Talismans.
Arms Lore
Arms Lore has the same effect Minimum Hit Chance increase for the Artifact of the Marksman as it does for a Phylactery of Resilience Talisman. Further details are provided in the Phylactery of Resilience section.
Amplified Damage
Artifact of the Marksman increases damage as the Talisman levels
- Level 1: 105%
- Level 2: 110%
- Level 3: 115%
- Level 4: 120%
- Level 5: 125%
- Level 6: 130%
- Level 7: 135%
- Level 8: 140%
- Level 9: 145%
- Level 10: 150%
Decrease Arrows Destroyed
Artifact of the Talisman lowers the chance of arrows being destroyed while auto attacking to 5% for hits and misses. Normally, arrows would be destroyed 25% of the time when it hits a target and 40% of the time when you miss.
Relics
Artifact of the Marksman has 7 relics available and you can enable up to 4 at a time depending on the Talisman's level. This talisman has two types of relics: active and passive. Passive relics provide advantages or abilities by simply having them enabled on your talisman. Active Relics can be used by selecting them from your Talisman Ability Gump.
Notes:
- Current relic color is a placeholder and will be changed.
- Certain mobs will be immune to CC (crowd control) effects such as champs or higher level paragons.
- Concussive Blast
- Relic Type: Active
- Cooldown: 65 seconds
- Applies Silence that lasts 5 seconds per Relic level, at max level will last 50 seconds (currently). Silence applies a debuff which prevents spell casting. Applying this debuff to a mob will interrupt their current spell channeling and prevent them from casting for the duration of the Silence
- Knee Strike
- Relic Type: Passive & Active
- Passive Cooldown: 3 seconds
- Active Cooldown: 65 seconds
- Passively debuffs your target, lowering their movement speed while auto attacking every 3 seconds and applies Knee Strike charges. Knee’s strike’s active ability consumes your Knee Strike charges and applies an even more powerful slow on your next attack. The amplified slow increases depending on the number of charges you have with 10 being the max. Each charge will reduce movespeed by 1/4.
- Pinning Lob
- Relic Type: Active
- Cooldown: 15 seconds
- Pushes the first mob that the arrow collides into back 3 tiles. If the mob collides with an obstacle or another mob, it will stun the mob for 1 second per level. If it is pushed into a mob, the mob it collides with will also be stunned for the same duration.
- Volley
- Relic Type: Active
- Cooldown: 65 seconds
- Your player will begin shooting massive amount arrows into the air at a target location every seconds for 10 seconds. Volley will be interrupted if you move or do not have enough arrows. Damage dealt 3 * Level and will be modified by arrow type modifiers.
- Piercing Shot
- Relic Type: Active
- Cooldown: 15 seconds
- Fire an arrow towards the selected target which pierces through all mobs for 14 tiles dealing Level * 3 damage.
- Hunter’s Focus
- Relic Type: Passive
- Cooldown: 30 seconds
- Provides a buff which greatly increases the attack speed for 5 seconds. You will receive 40 dex/stam per level. The buff will automatically be removed during PvP.
- Reclamation
- Relic Type: Passive
- Reclamation is a passive relic which automatically picks arrows up as they are being shot or from Active Relic abilities. It picks arrows up within the Relic’s level +1 tiles of your character. So, at level 1 it will pick up arrows within 2 tiles and at level 10 it will pick up arrows within 11 tiles.
Idol of Forbidden Magic

Overview
The Idol of Forbidden Magic is one of the most recently discovered Meta Talismans which can empower the Sosarian with the ability to perform Necromantic rituals to reanimate the corpses of recently slain creatures. The focus of this talisman to allow the practice of Necromancy to supplement your current playstyle, as this is the most versatile Talisman with the least amount of restrictions. The Idol of Forbidden Magic does not restrict you from the Animal Taming or Barding Skills, and allows for the Arms Lore Bonus. It functions very closely to a Summoner, in which you raise a small, but powerful, army that is under your control. These summons use Pet Control Slots, much like Summoned Daemons or Energy Vortexes, however there are some key differences in how they function when compared to normal Summons or Pets/Hirelings. Unlike the other Meta Talisman's Questline, there is a unique way to obtain this Talisman that involves spending time in the graveyards near the various Cities of Britannia and hunting for fragments of this forbidden knowledge.


More Information
For more information on the Idol of Forbidden Magic:
- Read about the story in the forums:Necromancer Talisman
- Be sure to check out the official Ultima Online Forever Youtube
- Read about obtaining the talisman, summoning rituals, relics, and more!: