Random Dungeon Adventure
Description

Random Dungeon Adventures, also known as RDAs are portals that spawn randomly through out the world. Entering one of these portals will teleport you into a dungeon containing a very powerful champion boss encounter with other monsters to clear as well. These RDA portals are blaze colored and have a fire elemental explosion effect on top of them.
Note: While you are allowed multiple accounts on UOForever, you may not have more than ONE (1) character, dead or alive, at any given time in a single RDA. Additional characters outside an RDA portal are allowed.
Spawn Rate
Following changes made in October 2017, RDAs have a chance to spawn from killing monsters. Two monster spawned RDAs can be active. There is a random window of 1-3 hours that a single RDA will stay open. If the RDA is not completed in that time it will close and a new one will spawn somewhere else. If a player does a single point of damage to the spawn the window will be given a 1 hour extension. If an RDA is completed within the time assigned to it, a new RDA won't spawn until that given time expires. For example, if a given RDA spawns with a 1:45 time and is found and completed in 40min the next RDA wont spawn until the full 1:45 passes.
Paragons
After damage is dealt by multiple individuals, RDA monsters will have a chance to turn into paragon forms of themselves. This increases the difficulty of the RDA significantly. The only boss capable of becoming paragon is the Dragon Progenitor.
Fragments

Aside from those that spawn randomly in the land, a player can also spawn their own RDA if they have five RDA fragments. This RDA can be spawned anywhere except in player housing. The RDA fragments can be obtained by:
- Finishing as the top scorer in an RDA.
- From Treasure Maps chests. The higher the map level, the greater chance of an RDA fragment.
- From Message in a Bottle chests.
Gem of Portals

This gem allows you to view portal statistics. It also allows the owner of the gem to purchase certain upgrades such as the ability to see what portals are active and the ability to receive special items. The gem can be purchased from the Unique Wares Vendor west of Britain bank for 1 million gold.
Gem of Portals Menu

Once you have purchased the Gem you will have access to basic RDA historical data. As mentioned above you will need to open this menu from the Gem itself. The historical data available to you involves ranking and statistical data of all players that have interacted with RDAs in the past. You will be able to view these players profiles that tell you total number of RDAs completed, including data such as total damage, murders, deaths and creatures kill. Total damage done is what builds your character RDA ranking. You also have the ability to search specific characters by their name. In the bottom right of the menu you will see a button for Portal Upgrades. This is where you will go to access how to upgrade your RDA Gem to gain additional features to benefit you.
Gem of Portals Upgrades

This menu in the Gem shows the two different upgrades available.
- Display Active Portals at 1 million gold, this upgrade then will show you what current RDA is up and active in the world to go locate. In the screenshot of the menu you will see that the RDA Lummox Dojo is up and ready to be found. If there is not an RDA showing then there is not an active RDAs currently in the world and is likely on cooldown.
- Increase Drop Rates at 2 million gold, this upgrade gives a chance to influence your ability for gaining additional drops at the an RDA.
Note: Confirmation is required, but based on past conversation it seems the way that it works is as follows. If you received the item drop in the RDA that is when the drop upgrade would attempt an upgrade roll. If the item drop went to someone without the gem then the upgrade roll would be wasted. This in mind it is most beneficial that all individuals participating have the portal gem and upgrade to provide the upgrade roll is not wasted.
Rewards
There are a number of potential rewards but don't expect to get something every time, particularly when the RDA is heavily contested!

- Power Scrolls - Can be awarded to anyone who has damaged the boss but total score does weigh into chances.
- Meta Dragon Eggs - Only drops in the Dragon's Peak encounter.
- Meta Crab Eggs - Only drops in the Shipwrecked encounter.
- Meta Relics - As with power scrolls, relics can be awarded to anyone who has damaged the boss but total score does weigh into chances.
- RDA Fragments - Awarded to the top scorer.
- Consumable Perks
Resources

- Crystals which are used to make Crystal Workbenches.
- You will need 120 Mining to acquire these.
- Shards required to create the Legendary Hammer
Encounters
The Dragon's Peak

Notes
- Spawn: Dragons, ancient wyrms, shadow wyrms (cannot be provoked), and tentacles of the Harrower
- Slayer Type: Dragon / Reptile
- Boss: Bahamut the Dragon Progenitor
- Special Ability: Bahamut has a fire breath that can do up to 80 damage when he is at full health but gets less powerful as his health decreases.
- Common Drops: ~11k gold, hammer shards, 2 Skill Scrolls, 1 Power Scroll
- Rare Drops: "The dragoon" Title, crafting recipe scrolls, Meta Dragon egg, statue, and Meta Pet relics.
- Minimum Score: To be eligible for a drop, you must score at least 1000 points in the RDA.
- Strategy: You may require multiple vets or mages to heal the pets. Best approach is 3 or more tamers healing the pet tanking.
The Crucible

Notes
- Spawn: Minotaur warriors (cannot be provoked), tentacles of the Harrower
- Slayer Type: Repond
- Boss: Minotaur Champion
- Special Ability: None.
- Common Drops: ~11k gold, hammer shards, 2 Skill Scrolls, 1 Power Scroll
- Rare Drops: "The Matador" Title, crafting recipe scrolls, statue, and Meta Pet relics.
- Minimum Score: To be eligible for a drop, you must score at least 1000 points in the RDA.
- Strategy: Minotaur warriors now deal additional damage to all tamed pets, making this RDA extremely difficult for tamers alone. Dexxers with slayer armor can survive but cross healing with a friend/party is recommended. Take care when tanking these creatures as they will change targets at times.
The Abyss

Notes
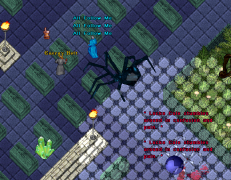
- Spawn: Devourer of souls (cannot be provoked), abyssal horror (cannot be provoked), tentacles of the Harrower.
- Slayer Type: Exorcism on main spawn and Dark Father, Silver on boss spawned by Dark Father.
- Boss: The Dark Father
- Special Ability: Reflects damage and spawns bones that turn into undead spawn.
- Common Drops: ~11k gold, hammer shards, 2 Skill Scrolls, 1 Power Scrolls
- Rare Drops: "The Lightbringer" Title, crafting recipe scrolls, statue, and Meta Pet relics.
- Minimum Score: To be eligible for a drop, you must score at least 1000 points in the RDA.
- Strategy: Several tamers are recommended, and with pets being cycled out to heal. Dexxers and mages will struggle due to reflect damage. Hit the Dark Father sparingly, focus on killing any undead spawn. Cut the bones with a dagger to prevent additional undead spawn.
The Hollow

Notes
- Spawn: Rock beetles (cannot be provoked, move very fast and do all physical damage), doom beetle (high Magery), and tentacles of the Harrower.
- Slayer Type: None
- Boss: Beetle King
- Special Ability: Throws pools of poison on the ground.
- Common Drops: ~11k gold, hammer shards, 2 Skill Scrolls, 1 Power Scrolls
- Rare Drops: "Bug Stomper" Title, crafting recipe scrolls, statue, and Meta Pet relics.
- Minimum Score: To be eligible for a drop, you must score at least 1000 points in the RDA.
- Strategy: The Beetle King boss will poison you by throwing poison on the ground if you move around the boss. This can cause your pets up take massive damage from his poison pools. With multiple tamers he can be boxed in to prevent movement. As a warrior, you must stand your ground and try not to move unless you have to to avoid being hit by poison.
Lummox Dojo

Notes
- Spawn: Lummox warriors (can be provoked onto, large aggro range, move very fast and hit hard, lummox mages (high magic damage), and tentacles of the Harrower.
- Slayer Type: Repond
- Boss: Lummox Chieftain
- Special Ability: Throws hard-hitting hatchets at random targets.
- Common Drops: ~11k gold, hammer shards, 2 Skill Scrolls, 1 Power Scroll
- Rare Drops: "Flummoxed!" Title, crafting recipe scrolls, statue, and Meta Pet relics.
- Minimum Score: To be eligible for a drop, you must score at least 1000 points in the RDA.
- Strategy: This can be a very tricky encounter. The entrance is the center of a room and the large aggro range on the lummoxes means that you likely be immediately targeted. It is almost inevitable that you will die a few times. Select a victim to lure the spawn away from one corner of the RDA and then make a run for that corner and slowly work your way out. On the boss himself, cross-heal and look out for those hatchets.
The Crypts

Notes
- Spawn: Undead wardog (very fast, all physical damage), dream wraith (high Magery), tentacles of the Harrower.
- Slayer Type: Silver
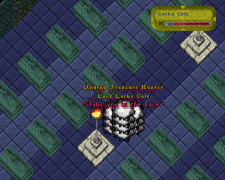
- Boss: Lord Locke Cole
- Special Ability: Summons weaker mirror images of himself which are best killed first before taking on the real Locke. Casts Ultima spell which drops on a huge area dealing a large amount of damage (450 on pets, 50+ on players). Launches a backstab attack which drops players to 10% health and infects them with deadly poisoning.
- Common Drops: ~11k gold, hammer shards, 2 Skill Scrolls, 1 Power Scrolls
- Rare Drops: "The Treasure Hunter" Title (previously "Locked and Loaded"), crafting recipe scrolls, statue, and Meta Pet relics.
- Minimum Score: To be eligible for a drop, you must score at least 1000 points in the RDA.
- Strategy: Use an archer to get him to cast mirror image and then pull the real Locke off and kill the weak ones. Once all mirror images are dead, pull Locke to the center and attack. Pull off pets when he casts Ultima. Pre-cast cure when he begins his backstab attack. Cure the poison and heal up. Dexers can do a lot of damage to Locke but may need mage support for cures and heals. If the player is not moving when backstabbed, there is a chance the boss will hit them again nearly instantly so it feels like a one hit. This is affectionally known as the double tap, thus it's key to keep moving when he is backstabbing.
-
Backstab
-
Ultima


The Haunted Mansion

Notes
- Spawn: Ghostly handmaiden (melee), ghostly bride/Chef Morden Ramsey/servant lord (melee, poison), apparition (mage).
- Slayer Type: Silver
- Boss: Baron Von Dewberry, the Phantom Baron
- Special Ability: Summon Burning Skeletons (summons fast moving skeletons that exploded for damage when in range, have low HP and can be killed easily), Terror (paralyzes and pushes nearby players, pets and summons away from boss, pushes 1 tile a second and does damage per push), Summon Undead (summons 2 ancient liches), and Power Surge (large damage to single player pets or summon).
- Common Drops: ~11k gold, Skill Scrolls, 1 Power Scrolls or Perk.
- Rare Drops: "Ghostbuster" Title, Crafting recipe scrolls, and Meta Pet relics.
- Minimum Score: To be eligible for a drop, you must score at least 1000 points in the RDA.
- Strategy:
Shipwrecked

Notes
- Spawn: Chesapeake Crab, Hardened Octopus, and Tentacles of the Harrower.
- Slayer Type: Arachnid
- Boss: Clawdia the Queen Crab
- Special Ability: Summons crab babies, Tidal Wave, Explosive Wave
- Common Drops: ~11k gold, Skill Scrolls, 1 RDA Frag, 1 Power Scrolls or Perk.
- Rare Drops: "Survivor" Title, Meta Crab Eggs, and Meta Pet relics.
- Minimum Score: To be eligible for a drop, you must score at least 1000 points in the RDA.
- Strategy: Clawdia has three different abilities that is uses during the encounter.
The first she summons several baby crabs that are initially immune to all damage and will create havoc if not handled. You need to crack their shells by either hitting them with the Tidal wave (best option to take out several) or the Explosive Wave as it runs over them (alot more tricky to pull off). Once their shells are cracked they are a very quick kill from any form of damage. If left unmanaged they will continually heal the boss as more and more babies pile up.
The second ability is the Tidal Wave. Clawdia will release a wave that move in a several tile wall in front of the crab queen. As the wave hits babies it will grab them and crack their shells when they collide with a stationary object (walls, pillars, etc). If players are hit by this ability they will be grabbed and sent with the wave to the same stationary object in the path and taking 50 damage once you stop.
The third ability is an Explosive wave. It is somewhat similar to Demon Fire at Arch and Lich Khan and if you are hit you will be instantly killed, as well as your pets. This ability sends out individual waves to pets and players in the encounter and will continue to chase you until they hit a stationary object. This means learning Line of Sight objects and hiding behind them will be your friend. This wave can break the baby shells, but it is somewhat difficult to run that wave through them while they are chasing you.
It is important to find a good balance of managing the baby crabs and protecting yourself with line of sight or it will get rather chaotic very quickly. A useful tip is that field spells work to block the various waves in the encounter. Paralyze field helps gather up and stop roaming baby crabs and set up for cracking a large amount of them. It also provides a place to pull your pets behind for protection from the explosive way.
City of Giants

Notes
- Spawn: Elephant, ettin bone collector, giant academic, elder ogre, elder ogre mage, and tentacles of the Harrower.
- Slayer Type: Repond
- Boss: The Mighty Albion, King of Kings
- Special Ability: Albion's main ability in the giant's one is that he summons clouds that have lightning and deal massive damage on the tile under them. It can annihilate pets if you're not careful, and characters too of course but it's easier to run out of the way than pull a pet.
- Common Drops: ~11k gold, Skill Scrolls, 1 Power Scrolls or Perk.
- Rare Drops: Crafting recipe scrolls and Meta Pet relics.
- Minimum Score: To be eligible for a drop, you must score at least 1000 points in the RDA.
- Strategy:
Portal of the Damned

Notes
- Spawn: Sulfur demon, demon hound, elder succubus, thrash hellspawn, higher demon, and tentacles of the Harrower.
- Slayer Type: Exorcism
- Boss: The Great Darkness, Knight of Hell
- Special Ability: Uses the same abilities as Fafnir.
- Common Drops: ~11k gold, Skill Scrolls, 1 Power Scrolls or Perk.
- Rare Drops: Crafting recipe scrolls and Meta Pet relics.
- Minimum Score: To be eligible for a drop, you must score at least 1000 points in the RDA.
- Strategy:
Contributors
The community would like to thank the following brave adventurers who contributed their time and experiences for others to enjoy:
- Messremb
- Bromista
- Arctium Minus
- Ahjuna
- Mastema
- Kamster
- Skye/Jade
- Tribe of Danann