Dungeon Bosses
Description
Dungeon Bosses, not to be confused with Champ Spawn bosses, are a unique PvM feature of UO Forever. They can be found in several of the classic dungeon and each one has different mechanics and special rewards.
Altars

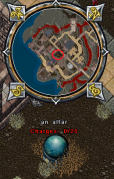
A few of the bosses are summoned by empowering Dungeon Altars with 50 crystals. These crystals have a chance to drop on creatures in the dungeon. To charge an altar with a crystal, double click the altar and target the crystal. You can also target your backpack or sub packs within your backpack and it will search for all valid crystals. The dungeon crystals will spawn on all mobs at death on a 5% chance. They will only spawn if a dungeon altar is placed in that specific dungeon region and will decay after 24 hours.
All crystal dungeon altars have a chance to award a Flawed Meta Talisman relic. To be eligible for a chance at the relic, you must contribute crystals the altar. At the end of the boss fight, there is a 10% chance that someone who contributed will receive a relic straight to their bank. You do not need to be alive or in range of the boss/altar for this to happen. The more crystals you contribute, the greater chance you have to win the relic if it drops. If you contribute all 50, you will have that 10% chance of receiving a relic.
There are 8 Meat Altars that can be found in the Mesozoic Lands, that require a total of 20 "raw dino ribs". This altar opens the Inner Summit area where you have to fight off special mobs before a boss is spawned.
Encounters
The following details were provided by lore master Adam and bold dungeon hunters Ariakan, Messremb and Suikoden.
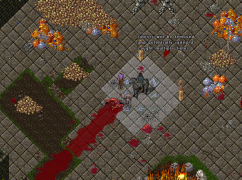
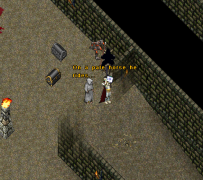
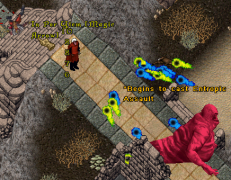
Arch Demon

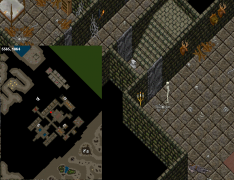
- Dungeon: Wrong
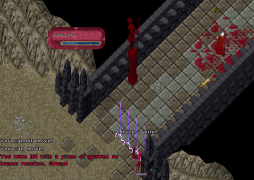
- Summoned: By waiting! He will spawn in a small room in Wrong every 4-5 hours after he was last killed, along with three tentacles of the Harrower. The room can be accessed by teleporter in the North East corner of Wrong Level 1.
- Slayer Type: Exorcism, Balron Slayer
- Special Abilities:
- Summoning Wards: This will summon a group of elemental wards that will attack players at intervals, these wards operate will target the persons who was closest to them for the longest amount of time. Lightning will occasionally strike the wards. If you are on top of a ward when this happens, you will be instantly killed. The four wards are:
- Fire ward: deals initial 10 damage and 2 damage ticks every second for 30ish seconds.
- Ice ward: deals initial 10 damage and freezes the player randomly for 30ish seconds.
- Lightning ward: deals 20 damage.
- Poison ward (watch out for this one): poisons a character with lethal poison and will reapply for 30 seconds, however every time a player cures the damage done is decreased by one poison level.
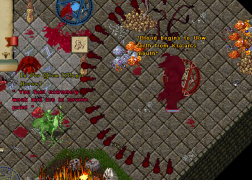
- Demon Fire: This is the demon fire attack, it creates a slow moving fire that follows a player, and kills them instantly if it hits them. This attack works on line of sight. Break the line of sight by running to the other side of the room, or into one of the small rooms and it will stop following you. It only targets players who are more than one tile away from the boss. If you cross the path of someone else's demon fire, you will take around 15 damage.
- Spewing Blood: This will fire an area of effect attack at a player, it will create a semi circle around the arch demon hitting everyone in the semi circle. Three waves of this attack are sent out, each dealing approximately 30 damage. This attack can be avoided by moving in and out of range of the boss. This will not guarantee that you will be avoid being damage but it limits the chance of getting hit. This attack only hits players more than 1 tile away. If you are very close when the attack is launched, all three waves of blood will hit you and you will be instantly killed.
- Ominous Object: Begins summoning an ominous looking object. This is a slow moving area of effect attack that hits a small circle all around the Boss, it deals massive damage killing anyone it hits. This attack is easy to avoid simply stand more than 8 or 9 tiles away.
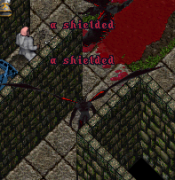
- A Shielded: The shielded will spawn and work very similar to Silvani from Lord Oaks. When the shielded is up Arch will take little to no damage until the shielded is dispatched.
- Loot (Must score at least 1 damage point):
- Meta Talismans Relic: Unlike the altar charged bosses, this has a chance to drop in your backpack rather than your bank. Watch out for thieves and player killers!
- Power Scrolls
- Mythical Crafting Recipe
-
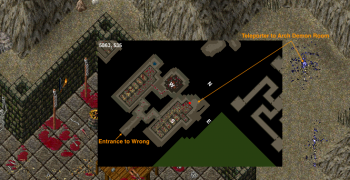
Location of Teleporter
-
Waiting for "Arch"
-
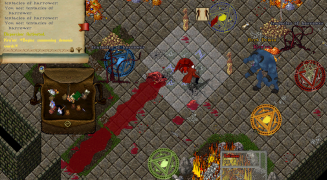
Demonic Wards
-
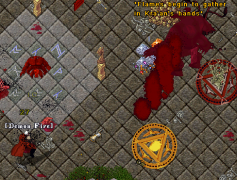
Demon Fire
-
Spewing Blood
-
Ominous Object
-
A Shielded


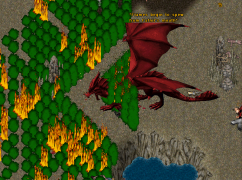
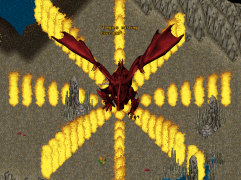
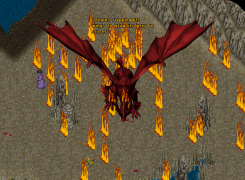
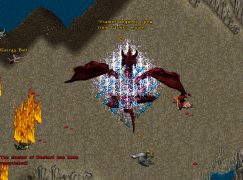
Fafnir

- Dungeon: Destard
- Summoned: By empowering the altar which is at the North West corner of Destard Level 1. It is filled with red crystals from the monsters in that dungeon.
- Slayer Type: Reptilian Death, Dragon Slaying
- Special Abilities:
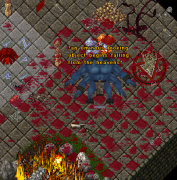
- Flame Spew: A 180° frontal flame breath attack. Leaves flames on the ground that last for 1 minute. Each flame will tick for 5 damage per second you stand on it. Casting wall of stone can block the attack (if you cast it fast enough after the emote). Fafnir will emote *Flames begin to spew from Fafnir's mouth* prior to casting this ability.
- Crucible: An instant death spell. It impacts all creatures and players in a 12 tile radius. It has a very long cast time. About 10 seconds from the time he emotes. This should be plenty of time to get you and your pets out of the ability. Each player or pet that is caught in the crucible will die and spawn a magma elemental. Fafnir will emote *Begins casting Crucible* when he used the ability.
- Wing Vacuum: Fafnir flaps his wings, creating a vacuum which will draw all creatures and players in a 10 tile radius towards him. This ability will dismount you, stun you and drag you closer to Fafnir every second. It ticks for 10 seconds, with each second drawing you closer and damaging you. Fafnir will emote *Begins flapping its wings to draw its prey in closer* when he used this ability.
- Loot (Must score at least 1000 points):
- Meta Talismans Relic: This has a chance to drop in the bank of those who put in crystals.
- Power Scrolls
- Mythical Crafting Recipe
- Title Scroll: Dragonbane Awarded to the highest damager on Fafnir. Drops 100% of the time.
- Sigurd's Shield: This shield is a common drop from the boss. It 100 charges which are used to block Fafnir's flame based attacks. Each blocked attack will use a charge.
- Fafnir's Head: Special text reads - The stuffed and mounted head of the legendary dragon, Fafnir. Uncommon drop.
- Sigurd's Armor: A piece of armor belonging to the legendary dragonslayer, Sigurd. Very rare drop. Comes in the form of: Chain leggings, Chain chest, Plate gloves, Dragon gorget and Dragon helm. Special text reads - An old piece of armor said to belong to the dragonslayer Sigurd.
- Balmung Sword: Does the crucible visual effect when equipped. Uber rare drop. Special text reads - A legendary sword which is said to contain the essences of one thousand slain dragons.
-
Fafnir Altar
-
Flame Spew
-
Crucible
-
Wing Vacuum
-
Fafnir Defeated!


Akor

- Dungeon: Covetous 5
- Summoned: By empowering the altar which is on top of the temple. It is filled with purple crystals from the monsters on that dungeon level only.
- Slayer Type: Reptilian Death, Dragon Slaying
- Special Abilities:
- Flame Breath: Being a dragon he does the standard flame breath attack that he sends at this current target.
- Teleport Attack: Similar to the berserker relic attack Phase Shift, Akor will teleport to a target inside of radius and do massive damage. He has destroyed many a brave warrior in this way. Staying outside of his Teleport range seems to be the best tactic to not be targeted.
- Loot (Must score at least 300 points):
- Meta Talismans Relic: This has a chance to drop in the bank of those who put in crystals.
- Meta Pet Relic
- Meta Dragon Egg: If it drops, it will appear on the ground under the top level of the temple.
- Power Scrolls
- Mythical Crafting Recipe
-
Stairs to Covetous 5
-
Altar Location
-
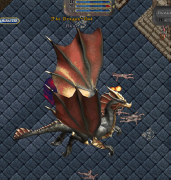
Akor Flying


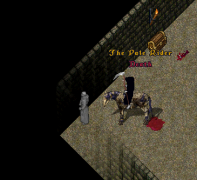
Adramalech - The Wretched King


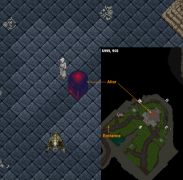
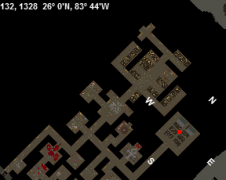
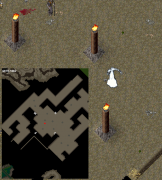
- Dungeon: Hythloth
- Summoned: By empowering the altar which sits in a room on the east side of the Level 1. It is filled with green crystals from the monsters in that dungeon.
- Special Abilities: Aside from casting regular offensive Magery spells, Adramalech also has several tricks up his sleeve...
- Entropic Assault: A barrage of green and blue fireballs that drops anyone in range down to a low health. Be prepared to cross-heal your fellow warriors.
- Summon Death: Summons the pale rider himself! Death moves fast and hits hard but is easily distracted and lured by a hidden character.
- Summoning Ritual: Casts several demonic pentagrams on the floor. Stepping on these causes small ticks of damage but at a fast rate. Best navigated around!
- Mark of the Beast: A large fiery area of effect attack that melts anything in its reach.
- Loot:
- Meta Talismans Relic: This has a chance to drop in the bank of those who put in crystals.
- Power Scrolls
- Mythical Crafting Recipe
- Title Scroll: Kingslayer
-
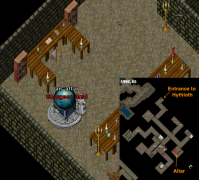
Location of Altar
-
Summoning Death
-
Death distracted
-
Entropic Assault
-
Mark of the Beast effect
-
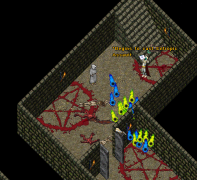
Summoning ritual pentagrams


Warlock

- Dungeon: Ankh. He was originally located in Covetous but decided to relocate to a more suitable location.
- Summoned: Long / Random time window. Spawns in Ankh Graveyard room.
- Special Abilities: Brave warriors and scholerly folks are currently confirming this. It is known that the Warlock has a very high level of Magery.
- Loot (Must score at least 700 points):
- Meta Pet Relic
- Power Scrolls
- Mythical Crafting Recipe
- Cracked Crystal Ball
-
Warlock Room

Lich Khan
- Dungeon: Deceit Level 5.
- Summoned: He spawns on a timer, like the Arch Demon, every 4-5 hours after he was last killed, along with three tentacles of the Harrower.
- Slayer Type: Silver
- Special Abilities: See Arch Demon
- Loot (Must score at least 700 points):
- Meta Talismans Relic: Unlike the altar charged bosses, this has a chance to drop in your backpack rather than your bank. Watch out for thieves and player killers!
- Power Scrolls
- Mythical Crafting Recipe
-
Lich Khan Spawn Area

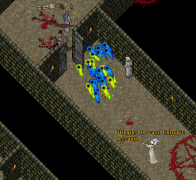
Kal'gedeth - Abomination Lord

- Dungeon: Montor
- Summoned: By empowering the altar which sits south of entry, but central in the main area. It is filled with green crystals from the monsters in that dungeon.
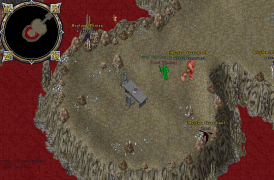
- Special Abilities: Kal'gedeth casts magic and had decent melee ability, but also has several skills at its disposal...
- Entropic Assault: A barrage of green and blue fireballs that hits a few selected targets removing 80% of their current HP, Stamina and Mana pools. Be prepared to cross-heal your fellow warriors.
- Plague: Kal'gedeth creates a zone around himself that applies plague to all those inside. If inflicted you will begin to puke repeated for 2 damage until runs its course. This is contagious and if you, or anyone else, pukes near eachother it will keep refreshing the timer. Those infected will need to stay away from eachother, this is especially difficult for tamer pets.
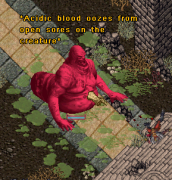
- Acid Blood: When damaged Kal'gedeth will release an area of acid blood onto the ground! This will do 5 damage per second, but only if you, or your pets, stay standing in the acid blood.
- Loot:
- Meta Talismans Relic: This has a chance to drop in the bank of those who put in crystals.
- Power Scrolls
- Mythical Crafting Recipe
- Title Scroll: Gluttonous
-
Montor Entrance
-
Location of Altar
-
Entropic Assault
-
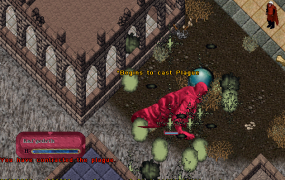
Plague
-
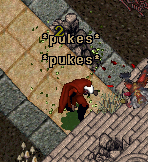
Plague - Puking
-
Acid Blood


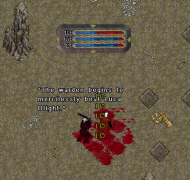
Lord Maleki - The Warden

- Dungeon: Asylum
- Summoned: Long / Random time window. He spawns in the back chamber of Asylum that requires green keys to enter. Also, an Ankh of Binding is required to get past the Asylum Guardian statue without it you will die instantly. This necklace MUST BE WORN to gain protection from the statue. It is in your best interest to bless the Ankh of Binding so you do not lose it.
- Special Abilities: The Warden is essentially a melee boss, but he has some powerful special moves available to him.
- Super Speed: He moves at amazing speed while chasing his target and had very high swing speed with his weapon. Being on foot it is very unlikely you will be able to get him off of you without paralyze or help from another player to slow him down.
- Devour Corpse: The Warden will eat players corpses when they die and add it to his own backpack, so make sure to come prepared.
- Have a Bite: He will toss a piece of chewed on human remains at the player causing damage. This damage does about 50% of your current HP.
- Merciless Attack: He will unleash a flurry of quick attacks at the target.
- Summon Vampires: Upon his calling he will bring several vampires to aid in his fight. Currently he can spawn up to a maximum of 4 vampires.
- Loot: Brave travelers are still confirming this!
- Meta Pet Relic:
- Aesthetic Relics: ONLY COMBUSTION RELIC DROPS ON THE WARDEN!
- Power Scrolls
- Mythical Crafting Recipe
- Title Hue:
- Title Scroll: The Warden
- Warden Platemail:
-
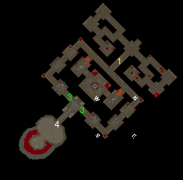
Chambers & Keys
-
Warden Room
-
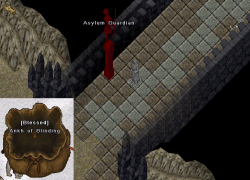
Asylum Guardian Statue
-
Have a Bite
-
Merciless Attack


Booty Island Dungeon
- Dungeon: Booty Island Dungeon
- Summoned: By placing four Medusa statues in Booty Island Dungeon, a dungeon encounter with a number of bosses is started. Players will be kicked out of the dungeon when this encounter begins. This is designed to be a challenging encounter for a larger guilder or organized group. Upon re-entering the dungeon, you must first kill 1000 mobs in the dungeon. A little counter will appear to show you the progress. Once you have killed 1000 monsters, four mini bosses will spawn and each will have a chance of a relic and Power Scrolls. When all four mini boss have been defeated, the final boss also known as Medusa will spawn in her secret lair! Many thanks to Medusa-slayers Koldes and Brom for providing information on the bosses!
Bosses
- Hydra: No notable attacks but it has very high hit-points and defence - Throw all your dragons at it!
- Shankhill the Butcher: This wily foe has some of the same attacks as the Arch Demon but does not drop any wards, shielded angels, or tentacles of the harrower.
- Minos the Minotaur: This pet eater has the same attacks as the Minotaur Champion. He will also charge towards a random pet or player but he will stare in that direction, tipping you off to where he will charge. Minos will one hit kill you within a 3-4 tile radius of his location and he will kill you even if you’re hidden or invisible.
- Argelmach the Sphinx: Throws large boulders at random pets or players which causes a large amount of area damage. This effect is similar to Chain-Lightning, where if you stand by someone, more boulders come and hit them. Argelmach will also summon titans and giant beetles. And finally Argelmach will drop sand bombs that ticks for 40 damage if it explodes when you’re standing on it.
- Medusa: Turns players/pets/summons into stone and then makes copies of them. Can also spawn summons on her own that can be dispelled (such naga, ogre lords, and wailed banshees) and shoot poison arrows across a long distance. Much like tentacles of the harrower, pets will not respond to an "all kill" command, you instead have to use "all guard".
-
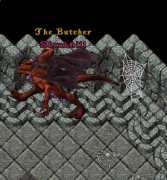
Shankhill
-
Hydra
-
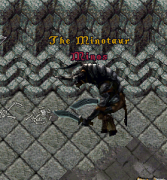
Minos
-
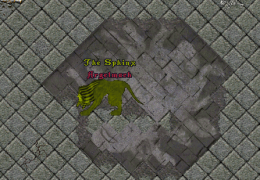
Sphinx


